Atelier Colibri

OUR BLOG
Welcome to the place where we give you tips & tricks!
From simple tips to professional tricks on how to prepare and execute your furniture refurbishment project, we love to share our knowledge and experience with our community. We typically first share our tips & tricks in the newsletter we publish every other month. Do you want to get these tips and more info first hand, from our newsletter? Subscribe using the button below and you'll be added to our distribution list!
Why an iron belongs in your woodworking toolbox
posted in May 2026
An iron might seem like an unusual tool for woodworking, but it’s surprisingly handy for a few key tasks, especially when it comes to removing stubborn glue or sticker residue and repairing delicate wood surfaces.
First, an iron is a game-changer for cleaning up sticky messes. Old price tags, adhesive labels, or dried glue can be a nightmare to scrape off without damaging the wood. Instead of using harsh solvents, simply place a damp cloth over the residue and gently press with a warm iron (use a towel as a protective barrier for the sole of your iron!). The steam and heat will soften the adhesive, allowing you to peel or scrape it away effortlessly with a metal tool. Once the residue is gone, a quick wipe with soapy water leaves the surface clean and ready for refinishing.
An iron is also great for repairing damaged wood. If you have a piece with a deep scratch or a lifted veneer, steam can help! By carefully applying a damp cloth and a warm iron (again with a towel to protect your
iron sole), the heat and moisture cause the wood fibers to swell slightly, helping to "plump up" dents or re-adhere loose veneer. For scratches, this method can make them less noticeable, while for veneer, it can help bond the layers back together before you apply glue and clamp it down. Just be sure to use low heat and keep the iron moving to avoid burning or discoloring the wood.
So next time you’re tackling a refurbishment project, remember your iron can be useful: it’s a simple, chemical-free way to clean, repair, and restore wood with ease!

A good primer matters!
posted in March 2026
Je suis un paragraphe. Cliquez ici pour ajouter votre propre texte et me modifier. C'est facile.
Applying a primer before color painting wooden furniture is a step you shouldn’t skip: it’s the foundation for a professional, long-lasting finish.
Why using a primer? Primer seals the wood, preventing tannins from bleeding through and ensuring your paint adheres evenly, which reduces the risk of peeling or chipping over time. Without primer, you may need more coats of paint, and the color can appear uneven or dull.
What types of primers are there? There are several types of primers to choose from: oil-based primers offer superior stain-blocking and durability, making them ideal for heavily used or stained pieces; water-based primers dry quickly, have low odor, and are easy to clean up, perfect for indoor projects; and shellac primers provide excellent adhesion and are the best for sealing knots or sap streaks.
What do I always use? Until very recently, I had been using shellac-based primers for because they seal wood perfectly, block stains, and create a smooth, durable base for paint. This means a flawless, long-lasting finish. BUT there was a caveat! Typical shellac dissolves only in alcohol which contains very high volatile organic compounds (VOCs). I was using primers made with modified shellac, which contain fewer volatile organic compounds (VOCs) than traditional alcohol-based options. However the modified-shellac-based primer I use is dissolved in ammonia, therefore I always needed to wear gloves and a good mask and to ensure good ventilation or working in a spacious area when applying this product.
I have just discovered that the same brand I was using also offer a very high quality water-based primer. I did a head to head comparison and it turned out that the water-based option perfectly matches the quality of the shellac-based primer. I did not wait any longer and made the switch! Very low levels of VOC, no need for anomia to wash my tools and any stain.... Definitely better for the environment, for my own health and for your when you join a workshop!
While I avoid promoting specific brands in this newsletter, I’m happy to share more details if you reach out!
In short: Investing a little extra time in priming will save you effort and ensure your upcycled furniture looks stunning for years to come! After you've red this, you'll never skip this step!
.jpg)
Always try out first!
posted in January 2026
Always test before you commit!
After sanding and fully preparing your furniture, choose a discreet spot, such as the back or underside, to apply a small sample of your chosen finish. This step is especially important when working with pigmented varnishes or stains. The product name and color example that are often on the lid are helpful guidelines, but not guarantees. Wood has character, and every piece reacts differently depending on its type, age, and past life. A quick test now can prevent surprises later and ensures your final result looks intentional rather than “unexpectedly artistic.”

My sanding secrets.....
posted in November 2025
Sanding is not a boring task, it’s an art! I love sanding, I love long sanding with my headset on and a great podcast! But above all I love a perfect sanding! It seems straight forward, but quite a few things can go wrong with sanding, that’s why I want to share my tips on efficacious and smooth sanding.
First, on any shiny and thick finish (e.g. old varnish, wax): start with scraping. Use a dedicated scraper which you can find in any hardware store, or a simple kitchen knife blade which you hold directly in your fingers. Don't be scared to scratch the wood, the old finish typically first comes off and you need to press rather hard on the scraper or blade to take it off. Plus, should you scratch the wood: you'll take that off when sanding.
After scraping make a good clean of your wooden surface with water and soap. Make sure you rinse the soap off and let it dry fully before you continue.
You are now ready to start sanding. Start with low grid sanding paper (e.g. 60 or 80). This will enable you to remove all leftovers of old finish. Make sure you wipe the wooden surface with a wet cloth after each step to remove all dust and particles, and let it dry fully before you start with the next sanding step. Continue sanding with a higher grid sanding paper (e.g. 120 or 180). You will refine the smoothness of the wooden surface. Wipe and let it dry again. Now you can sand with your highest grid sanding paper (e.g. 240 or 320). This will be your last sanding step, yielding a perfectly smooth surface ready to be stained or painted!
All sanding can be done by hand if you have a small surface or are not equipped with sanding machines. You can also use electric sanding machines for larger pieces or to speed up the process. More details on what type of machine for what type of work in a next tip from Sarah!
To be clear: yes it is tedious! Is there a way around: not really if you want to have a durable refurbishing of your wooden furniture. My extra tip: wear a good noise cancelling head set and put a good podcast on when sanding: it will make this step meditative and relaxing!

What to do with old harware?
posted in September 2025
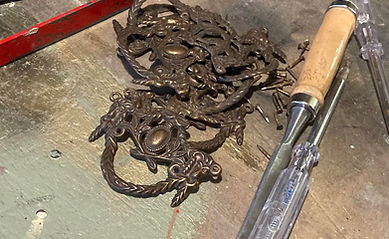
One important tip, too often overlooked when people want to give a new life to an old piece of furniture: the hardware! What I mean with hardware is the handles and knobs, hinges and other metal pieces. I have seen so many people sanding and re-painting around or on hardware... Please, do not do that! It is impossible to perfectly remove an old finish around hardware, and painting over a metal piece increases the risk of paint cracking.
My tip is: please take the time and remove ALL hardware. Take it all off! Then you can sand over the hardware location, and paint as you would do on any wood.
If your hardware is old, it needs a clean up. Most old hardware are made of brass, a mix of copper and zinc. I advice to soak them for a few hours in a white vinegar bath. You’ll see bubbles forming: this is the natural reaction of acetic acid removing copper oxide. A gentle brush with steel wool (or a gentle brush) will remove the final stains and oxide. Finally, wipe your clean metal pieces with flaxseed oil for a long protection. Your hardware is ready to be placed back on the furniture!